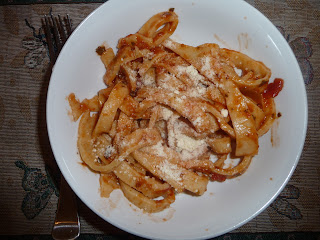
Pasta. I know, I know, you don't really bake pasta but it wasn't part of my 2 year adventure so I put it under baking for fun. The reason I'm making pasta is because I'm about to start a project on international cuisine so I have book all over the place and one of them happened to be: The encyclopedia of Italian cooking. I've been wanting to make pasta for a while but I didn't have a recipe or the machine. When I saw the recipe for pasta, I said "BOOM! I'll make ravioli. You don't need a machine to cut the pasta and there's a recipe." I was looking for a good filling and I came across how to cut pasta WITHOUT a machine. I was so happy. So today for lunch, I made some pasta. Here's how you make pasta:
1 cup flour per serving
1 egg per serving
What you do is you put the flour on a surface and you mound it up and make a well in the center big enough for the egg(s) to fit in. Then crack the correct amount of eggs into the well. Take a fork and start breaking up the egg yolk(s). Then, mix the yolk(s) with the white(s). As you're mixing the egg(s), slowly start pushing the flour into the egg(s). Once you've pushed in all or mot of the flour you should end up with a crumbly dough. Start to knead the dough. Once you've kneaded your dough into a ball cover it and leave it for 30 minutes. I covered mine with an inverted bowl. After the 30 minutes have passed, roll out your dough as thin as possible. Fold the dough in half, then in half again. With a very sharp knife, cut the short way and make each strip about 1/4 of an inch wide. Unfold and separate your pasta. Put the pasta in boiling salted water for 5-7 minutes, depending on how thin you rolled your dough. When your pasta is finished drain and wash it. Then heat up some tomato sauce (homemade or canned, whichever you prefer) and toss the pasta in the sauce. Top with cheese if you like and serve. I know it sounds hard and the hardest past is definitely making the dough but the end result is soooo worth the effort.
See you next time internet! Lover, Alexa :)
Week 6:
Yesterday I made beef and pinto bean chili. My mom LOVES pinto beans so this recipe was great! For this dish my dad did all the prep and I just cooked the dish. There always has to be something new you cook with or a new technique you learn and this time, it was a new ingredient. The ingredient I cooked with for the first time ever was.... beer. Yep. A 13 year old put beer in her stew. Most of you are probably like "Putting beer in things is completely normal!!!!" and it is. But to me, this was so different. This was the dish that took the longest so far because it had to simmer for 1 1/2 hours. We ended up eating lunch at 2 when we were meant to eat at 1. I gave the list of groceries to my dad and I forgot the pinto beans. Because of this, I had to run to the store to get some. The dish was great, my family loved it, it got an even higher ranking than last weeks dish. My family gave it...........9.7 yep. I'm happy. I'm missing next week because I'm going away for spring break, but I'll be back soon!

See you next time internet! Love, Alexa :)
I made a white cake as the base for my St. Patrick's day mint chocolate-chip cake but this is a great white cake recipe for any cake. The recipe is originally for five 8 inch layers but I made three 9 inch and it was perfect. Here's the recipe:
28 tbsp of butter (3 1/2 sticks)
6 1/2 cups of cake flour
3 tbsp baking powder
Salt
2 1/4 cups whole milk
2 tbsp vanilla extract
2 1/2 cup sugar
10 large egg whites
Preheat oven to 350. Line your pan(s) with parchment paper. Sift flour, baking powder, and 1/2 tsp of salt into a large bowl. Combine milk and vanilla. Beat butter with a mixer on medium speed until smooth. Gradually add the sugar to the butter. Beat until light and fluffy (about 3 minutes). Reduce speed to low and add the flour in three additions, alternating with the milk mixture, beginning and ending with flour. Beat until just combined, do not over mix. If you are putting in any add-ins then do that now. Beat the egg whites in a clean bowl on medium speed until stiff (but not dry) peaks form (about 3 minutes). Gently fold the egg-white mixture into the batter in 3 additions. Divide the layers and bake for 18-20 or until a toothpick inserted into the cake comes out clean. Let it cool completely, then using a offset spatula or a knife loosen the edges and turn the cake out onto a plate, wire rack or even a baking sheet. Trim the domes that have formed on the cakes to make the cake even. Spread with whatever icing you like!
See you next time internet! Love, Alexa :)
For St.Patrick's day I decided to make a mint chocolate-chip cake. I really liked the images on the website I found the cake on because when the cake isn't cut, I looks like a chocolate dream. But the inside... Is a bright and vibrant green. Here's the recipe:
1 recipe white layer cake (use whatever you want)
2 1/2 cups chocolate chips
1 1/2 tsp mint extract
Green food coloring
20 tbsp (2 1/2 sticks) butter, cut into pieces and sofened
8 oz bittersweet chocolate, melted and cooled
1 tsp vanilla extract
1/8 tsp salt
2 cups icing sugar
Everything after the food coloring is for the chocolate icing. You can use whatever icing you want but this chocolate icing was amazing! Anyway, this is how you make it. Make your white cake batter then add in 1 cup of chocolate chips, the mint extract, and the food coloring. Mix it up and bake it in three 8 or 9 inch pans at 350 for 20-25 minutes. I used 9 inch. Cool the cake completely (about one hour). For the icing beat all the ingredients other than the icing sugar on medium-high speed until the ingredients are combined. Reduce the speed to medium-low and gradually add the icing sugar. Beat the icing on high speed until it's light and fluffy (3-5 minutes). Ice the cake with about 3/4 of a cup of icing between each layer. Use the remaining chocolate-chips to press onto the cake. And you're done!
See you next time internet! Love, Alexa :)
I am going to make a cake and I wanted to make modeling chocolate figures to go on top. The recipe for the modeling chocolate is as follows:
14 oz of white chocolate
1/3 cup of light corn syrup
And that's all the ingredients!
What you do is that you melt the chocolate then swirl in the corn syrup until the mix gets the consistency of taffy. Then, place the mixture between two sheets of wax paper then roll it out until you have a sheet of 1/4 inch thick. Let it set for two hours and you're done! Add color as desired. To use work in your hands until it gets the consistency of clay. Pretty easy. I'm not the best sculptor so my creations weren't the best... But anyway, the modeling chocolate actually worked really worked.
See you next time internet! Love, Alexa :)
So yesterday I decided to make a lemon meringue pie. I've made lemon meringue pies before, it was a pie I was familiar with, It actually pretty easy. I was also really psyched because my dad got me a lemon juicer and and egg separator for international women's day. I did the crust. Not good. Lumpy, uneven,and just BAD in general. I did the filling. Good, but I forgot the lemon zest. I started to make my meringue. DISASTER. I have no clue what went wrong. It was just NOT working. I tried adding extra cream of tartar, that didn't work... I was literally at the mixer for 15 minutes, trying to get this meringue to work. I ended up throwing a bit of a tantrum because the the other times I had attempted this pie it was beautiful, it was perfect, and it was pure bliss. I not going to give you guy the recipe this time (because I'm really mad at it) but if I decide to make this pie again AND it works, then I'll post the recipe.
What my pie was supposed to look like
What my pie looked like
See you next time internet! Love, Alexa :)
Week 5:
Today was my first drink. This morning my dad and I made my mom a chocolate cappuccino. Yummmm...? I personally am not a fan of coffee and my dad only drinks decaf so only my mom tried it. I learned how to use our coffee machine and I learned how to scald milk. The end product looked pretty good with a nice dust of cinnamon on top. My mom gave the drink a 8/10.

Once again, I was all alone... My parents went to look for some houses while I made dinner. The came home in time for my dad to help me with frying the chicken. The "Greek inspired" pretty much means there are kalamata olives and feta cheese in the salad. I think that this dish was probably the best one yet because my family gave it the highest rating yet. Personally, I love barley and I would have LOVED the dish, except that when I was making the dressing, I added in my garlic then stirred my sauce and realized... the "minced" garlic was HUGE! I couldn't really take it out of the dressing so i was trying to crush the garlic in the bowl with a fork... but I was pretty proud of my dressing because it had thyme in it. Now this might not seem like a big deal but for those of you who don't know what thyme is, here it is:
Now, if you are using this herb, you can't use the stems. All you can use are those tiny leaves. This was a problem because I needed a full teaspoon of the leaves and theses leaves are the size of a grain of rice... and you have to pick them off the stems... ANYWAY, it took forever to get that part done. So remember how I mentioned that this dish had the highest ranking so far... Well, my family gave the dish a 9/10 (I really hope that that's the highest score so far so that I don't look stupid). Overall, Greek inspired chicken and barley salad, pretty good experience.
See you next time internet! Love, Alexa :)
Week 4:
A couple days ago I made chipotle bean burritos. I'm saying a few days ago because my internet was down so I couldn't post anything on my blog. This was the first recipe from my 2 year adventure that I have made on my own. This lead to a couple problems. Problem #1: the avacado I picked to make guacamole was under-ripe making for a very chunky guacamole. Problem #2: I butchered my tomatoes. All the pieces were different sizes and it was pretty bad. Problem #3: I was going to add 1/2 the amount of chili powder (since my great-aunt doesn't like spicy food), but in the end I added 1/4 witch made the beans very bland. The dish was pretty simple. My family gave it 7/10. I have a question for you guys: I put this recipe under fruits and vegetables but what would you put it under? Here are the options: appetizers, eggs/dairy, seafood, meat, poultry, soups/salads, vegetables/fruits, sauces/dressing/gravies, breads/grains/pastas, microwave recipes, and desserts. I'm really not sure how bean burritos fit under fruits and vegetables but that seemed like the only thing that fit. If you guys have a different opinion please tell me. By the way, the dish was vegetarian.

See you next time internet! Love, Alexa :)


